The Coolest Skoolie Bathroom
This article was written for and originally posted by Bus Life Adventure, along with a video explanation on their YouTube with the banner “Coolest Skoolie Bathroom” – a compliment that went straight to our hearts.
While I don’t know if ours is the absolute coolest skoolie bathroom ever, I am pretty fond of it. Our bathroom was actually the first part of our build that was set in stone. I’d seen a photo on Pinterest of a concrete wet room-styled bathroom while the bus was nothing but a dream in our heads, and nothing could shake me from the vision after. One of Mike’s big design criteria was that the bus did not have a center aisle floorplan with a split bathroom, and I was happy to comply.
A wet room wasn’t just aesthetically appealing to me, it seemed practical. After all, how much more space-saving can you get than combining all the elements of a bathroom into one space with no additional walls to interfere? But the concrete look had two problems – poured concrete weighs a ton, and with the constant shifting of a moving vehicle, would likely crack.
After some research, we found Ardex feather finish concrete, which became not only the solution for our bathroom but a handy solution for our kitchen counters and our wood stove surround and firebox. This veneer product is lightweight and easy to use. And after a year and a half of use and travel, we can confidently say it holds up to the movement of bus life.
Here was our process.
STEP ONE: CREATE THE FORMS
We used hardwood plywood and 2x4s to create the foundation for the concrete. The floor, walls, and counter were built entirely out of wood. We even created little built-in shelves on one wall that would later hold our shampoo and soap.
The hardest part of ensuring our homemade shower pan had the proper slope to ensure good drainage is not an easy feat when your home is a bus that isn’t always parked on level surfaces!
STEP TWO: MAKE IT WATERTIGHT
Wood is porous and prone to rot, so we needed to make sure our forms weren’t rotting away underneath the concrete. First, we used bathroom silicone to seal every single screw hole and seam. Next, there are paintable rubber products that create a thin, waterproof barrier. We recommend several coats over the entire surface. Finally, we laid a heavy silicone mat designed for tiled shower floors and sealed the edges with more silicone to add extra protection to the floor, since it would be in more constant contact with water than the walls.
STEP THREE: CONCRETE THE FORMS
The feather finish concrete was incredibly easy to use. Using a concrete spatula, we spread uniformly thin layers one at a time. Between each layer, we would allow it to dry completely, and then sand down any edges we didn’t like. We originally planned to make the concrete smooth but decided after the first few layers that we preferred the texture of the freshly finished layers to the sanded-down ones and left our last coat slightly bumpy and ridged.
STEP FOUR: WATERPROOF THE CONCRETE
As concrete is also porous, it required further waterproofing to ensure water wasn’t absorbed into it. In the bathroom, we used two coats of heavy-duty concrete sealer made for concrete floors. In the kitchen, on our counters where food would be prepared, we used a food-grade concrete sealer.
MAINTENANCE AND QUESTIONS
We frequently get asked how the concrete has held up, and if it requires maintenance. While we’ve noticed some small, hairline cracks here and there (generally at seams in the wood), they’re easily fixed and few between. We’ve actually been really impressed with the durability of this product. We do perform maintenance on it in the way of resealing the concrete annually as a precaution, but other than that both the bathroom and counters have been easy to use and care for.
REMODELING THE BATHROOM TO FIT OUR NEEDS
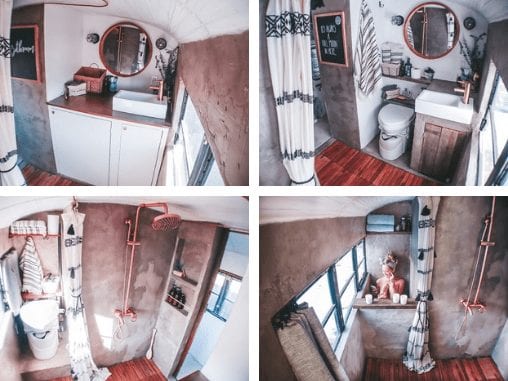
The rest of the bathroom came easy after the concrete. I knew I wanted copper fixtures to gleam against the concrete, a composting toilet, and a small sink with a utility closet for our water heater underneath. Initially, I was positive that we would absolutely need a washer and dryer unit, so that was part of our original design as well. We placed the toilet on a wheel well behind the shower area, and a large vanity that contained our combo washer/dryer unit sat opposite.
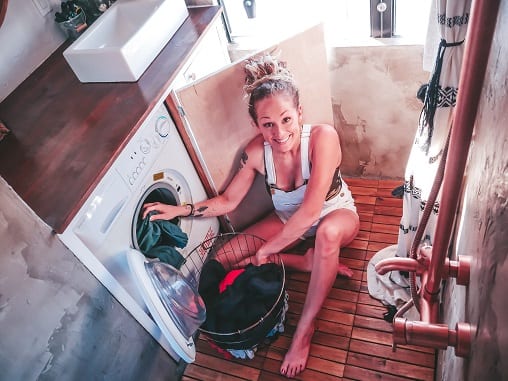
But as bus life will teach you, you don’t know what you need or what will work until you’ve lived with it! A few months later we realized we hardly used our washer/dryer unit because it required us to be plugged into shore power, and I missed being able to take a bath. So our first remodel commenced – we removed that large vanity and replaced it with a smaller one, moved the toilet to sit beside it, and created a concrete built-in tub over the wheel well the toilet had been housed in.
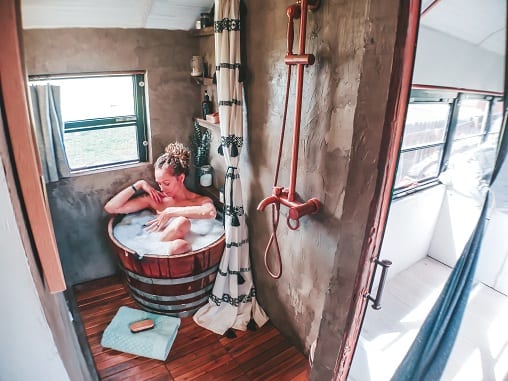
While I truly loved that big tub, a few months after that we wanted to expand the closet area in our bedroom, and we realized that if we were willing to downgrade our tub we could absorb that wheel well into our bedroom. While I was loathe to say goodbye to the beautiful concrete tub we’d just put in, I also really wanted more space in the bedroom, and removing the tub used once a week versus expanding our bedroom in a way that was more livable every day was a no-brainer. Then I found our current tub, an old wine barrel that was cut in half, and I knew we’d found the perfect solution.
OUR SKOOLIE BATHROOM TODAY
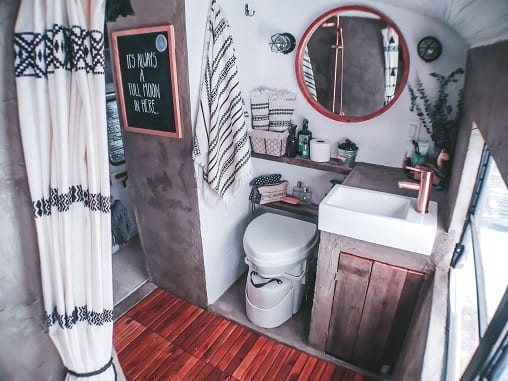
In its final state, the layout of the bathroom is exactly what we need. It measures five feet by five feet, with a small 2×2 section cut out of one wall where the wood stove sits on the other side. We laid Acacia wood tiles on the concrete floor so that we weren’t standing in water after our shower while we got ready and to help prevent slipping.
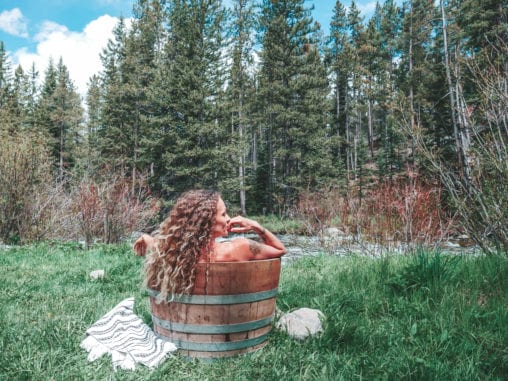
The wine barrel tub isn’t plumbed in, which allows us to bring it outside. It drains through a small hole we drilled into the bottom onto the shower floor and through the tiles, and the hose attachment of our shower means we can fill it inside or out through the bathroom window when it’s outside. Because the hallway outside the bathroom is too narrow to bring it through the bathroom door, we created a hidden door that looks like a wall of shelve behind it. When we want to move it in or out we unlatch the small hook, pull that wall open, and bring the tub in and out through our bedroom where there’s plenty of room to maneuver it.
In our final remodel, we sunk our tiny white porcelain sink with its copper fittings into the countertop to create a flush farmhouse-look sink and added shelves behind the toilet for extra storage. A shower curtain hangs on a rod that circles the shower, allowing us to keep the water contained but move out of the way to reopen the space when we’re done.
THE COOLEST SKOOLIE BATHROOM
Okay, our bathroom may not be the coolest skoolie bathroom ever, but it is perfect for us. The bathroom has changed several times over, but each change is better than the last and has led to a functional space that we adore. One of my favorite things in the world is a Sunday morning bath in our tiny bathroom, a little window thrown wide to the big world outside while I’m cozy inside with a hot cup of coffee.
We’re always happy to field questions about our bathroom or any other part of our build for others. We have several videos and articles about the bathroom on our IGTV and blog and can be reached for further questions through our Instagram or by emailing info@sincewewokeup.com.


